


State Management
State management is crucial when developing Flutter applications. In a typical Flutter application, a single screen can contain many different states, which are constantly changing as a user interacts with the application. It could be something as simple as toggling a Switch in the settings page or as complex as displaying an HTTP response.
Flutter provides the StatefulWidget, which allows an application's state to be updated using the setState method. This is especially useful in simple applications but as the complexity of an application grows, its low-level nature could make managing the application state quite challenging.
Flutter has many popular packages that help simplify state management. Some of these include Provider, BLoC, Riverpod, and GetX. Choosing which one to use depends on your needs.
In this article, we'll be looking at GetX, which is coincidentally the most liked package on pub.dev at the time this article was published. GetX requires minimal setup and does much of the heavy lifting, allowing you to focus on writing your core application's business logic.
GetX
GetX is a simplified Flutter state management solution, which relies on reactive programming. Some of the benefits of using GetX include the following:
It rebuilds only selected widgets.
BuildContextuse is not required.Stateful widget use is not required.
Code generation is not needed.
Decoupling of presentation and business logic layers.
Auto cleanup of resources.
When using GetX for state management, you're generally concerned with two components:
Controllers: This is where the state of the application is stored and managed. This is where your business logic goes. A controller is generally created for each feature.
GetX Views/widgets: These are specialized widgets that listen to and react to changes in the controller.
GetX provides the following two state managers:
Simple State Manager (GetBuilder)
Reactive State Manager (GetX/Obx)
GetBuilder vs Obx
GetBuilder is a GetX widget that wraps around a widget holding a state via its builder function. It rebuilds to reflect a new state when the update function is called in the controller class, quite similar to setState of StatefulWidget and notifyListeners of ChangeNotifier.
Obx is a reactive GetX widget that also wraps around a widget holding a state. It takes a lambda function in its constructor which has a return value of the widget. Unlike GetBuilder, Obx does not require a call to the update function to rebuild. Obx listens for changes to observable types like RxInt, RxString, RxBool, etc. Appending .obs to a field's value makes it observable.
Now that you know how GetX works, let's walk through a code sample of its usage. We'll build an application that performs basic arithmetic operations, using GetX to manage the application state.
Setting up the project
#1. Create a new flutter project, name it getx_calculator , and run it to ensure everything is working fine.
#2. Run flutter pub add get in the terminal to add the GetX package to your pubspec.yaml.
Creating the Controllers
As mentioned above, GetX has two state managers. We'll first dive into using the Simple State Manager (GetBuilder).
#1. Create a new directory within your lib directory and call it controllers
#2. Create a new dart file for the controller under the controllers directory, naming it calc_controller.dart
#3. Create the CalculationController class inside calc_controller.dart
import 'package:get/get.dart';

class CalculationController extends GetxController { }
We have to extend the GetxController class to create a controller.
#4. Add the following fields in CalculationController :
  //current operator
  String _currentSign = "+";
  String get currentSign => _currentSign;

  //First operand
  int _numOne = 0;
  int get numOne => _numOne;

  //Second operand
  int _numTwo = 0;
  int get numTwo => _numTwo;

  //Result of the operation
  int _result = 0;
  int get result => _result;
These fields are the states of our application.
#5. Add the following methods to CalculationController :
  void increaseNumOne() {
    _numOne++;
    update();
  }

  void increaseNumTwo() {
    _numTwo++;
    update();
  }

  void decreaseNumOne() {
    _numOne--;
    update();
  }

  void decreaseNumTwo() {
    _numTwo--;
    update();
  }

  void add() {
    _currentSign = "+";
    _result = _numOne + _numTwo;
    update();
  }

  void subtract() {
    _currentSign = "-";
    _result = _numOne - _numTwo;
    update();
  }

  void multiply() {
    _currentSign = "x";
    _result = _numOne * _numTwo;
    update();
  }

  void divide() {
    _currentSign = "/";
    _result = _numOne ~/ _numTwo;
    update();
  }

  void reset() {
    _numOne = 0;
    _numTwo = 0;
    _result = 0;
    update();
  }
This is the business logic of our application. The update function call ensures the presentation layer receives updates to the application state.
Creating the Presentation Layer
#1. Replace main.dart with the code below:
import 'package:flutter/material.dart';
import 'package:get/get.dart';
import 'controllers/calc_controller.dart';

typedef OnTap = void Function();

void main() {
  runApp(
    const MaterialApp(
      title: "GetX Example",
      home: Home(),
      debugShowCheckedModeBanner: false,
    ),
  );
}
#2. Add the Home widget to main.dart
class Home extends StatelessWidget {
  const Home({Key? key}) : super(key: key);

  @override
  Widget build(BuildContext context) {
    //Creates and injects the controller
    final controller = Get.put(CalculationController());
    return Scaffold(
        appBar: AppBar(
          title: const Text("GetX Example"),
        ),
        body: Container(
          margin: const EdgeInsets.symmetric(horizontal: 10, vertical: 5),
          child: Column(
            children: [
              Card(
                child: SizedBox(
                  width: double.maxFinite,
                  height: 100,
                  child: _calcWidget(),
                ),
              ),
              Expanded(
                child: Column(
                  mainAxisAlignment: MainAxisAlignment.center,
                  children: [
                    Row(
                      mainAxisAlignment: MainAxisAlignment.spaceBetween,
                      children: [
                        Expanded(
                          child: _tapButton(
                            "+ NumOne",
                            Colors.grey.shade700,
                            () {
                              controller.increaseNumOne();
                            },
                          ),
                        ),
                        const SizedBox(width: 10),
                        Expanded(
                          child: _tapButton(
                            "+ NumTwo",
                            Colors.blueGrey,
                            () {
                              controller.increaseNumTwo();
                            },
                          ),
                        ),
                      ],
                    ),
                    const SizedBox(height: 10.0),
                    Row(
                      mainAxisAlignment: MainAxisAlignment.spaceBetween,
                      children: [
                        Expanded(
                          child: _tapButton(
                            "- NumOne",
                            Colors.grey,
                            () {
                              controller.decreaseNumOne();
                            },
                          ),
                        ),
                        const SizedBox(width: 10),
                        Expanded(
                          child: _tapButton(
                            "- NumTwo",
                            Colors.blueGrey.shade300,
                            () {
                              controller.decreaseNumTwo();
                            },
                          ),
                        ),
                      ],
                    ),
                    const SizedBox(height: 10.0),
                    _tapButton(
                      "Add",
                      Colors.green,
                      () {
                        controller.add();
                      },
                    ),
                    const SizedBox(height: 10.0),
                    _tapButton(
                      "Subtract",
                      Colors.blueAccent,
                      () {
                        controller.subtract();
                      },
                    ),
                    const SizedBox(height: 10.0),
                    _tapButton(
                      "Multiply",
                      Colors.amber,
                      () {
                        controller.multiply();
                      },
                    ),
                    const SizedBox(height: 10.0),
                    _tapButton(
                      "Divide",
                      Colors.red,
                      () {
                        controller.divide();
                      },
                    ),
                    const SizedBox(height: 10.0),
                    _tapButton(
                      "Reset",
                      Colors.teal,
                      () {
                        controller.reset();
                      },
                    )
                  ],
                ),
              )
            ],
          ),
        ));
  }

  Widget _tapButton(String title, Color color, OnTap onTap) {
    return SizedBox(
      width: double.maxFinite,
      height: 50,
      child: ElevatedButton(
        onPressed: onTap,
        style: ElevatedButton.styleFrom(backgroundColor: color),
        child: Text(
          title,
          style: const TextStyle(
            fontSize: 18,
            fontWeight: FontWeight.bold,
          ),
        ),
      ),
    );
  }
}
final controller = Get.put(CalculationController()); creates the CalculationController and injects it, which makes the controller available below the widget tree. The instantiated controller is used in the tap function of the buttons to call the appropriate controller method.
#3. Add the following function to the Home widget class:
Widget _calcWidget() {
    return GetBuilder<CalculationController>(
      builder: (calcController) {
        return Center(
          child: Text(
            "${calcController.numOne} ${calcController.currentSign} ${calcController.numTwo} = ${calcController.result}",
            style: const TextStyle(
                fontSize: 30, color: Colors.black),
          ),
        );
      },
    );
  }
The code above uses the GetBuilder widget to wrap around the Center widget, which holds the Text widget where the CalculationController states are used. The builder function is called, triggering a rebuild each time one of the states changes.
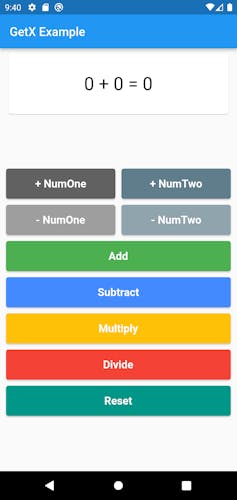
#4. Run the project on your emulator or device. It should look like the screen below
Reactive State Manager (Obx/GetX)
As noted earlier, both Obx and GetX are reactive widgets that listen for changes in observable types/states. The notable difference between them is that the GetX builder function has a controller parameter while Obx doesn't. GetX also has an init parameter that can be used to initialize a controller.
We'll refactor our application to use Obx and observables for the state.
#1. Change the CalculationController fields to the following:
  //Current operator
  final RxString _currentSign = "+".obs;
  RxString get currentSign => _currentSign;

  //First operand
  final RxInt _numOne = 0.obs;
  RxInt get numOne => _numOne;

  //Second operand
  final RxInt _numTwo = 0.obs;
  RxInt get numTwo => _numTwo;

  //Result of the operation
  final RxInt _result = 0.obs;
  RxInt get result => _result;
Appending the .obs getter to our values converts the field to an Rx observable. GetX provides Observable types for all the basic data types in dart. Custom classes can also be made observable by affixing .obs to its instance or field values.
#2. Update the CalculationController methods to the following:
  void increaseNumOne() {
    _numOne.value++;
  }

  void increaseNumTwo() {
    _numTwo.value++;
  }

  void decreaseNumOne() {
    _numOne.value--;
  }

  void decreaseNumTwo() {
    _numTwo.value--;
  }

  void add() {
    _currentSign.value = "+";
    _result.value = _numOne.value + _numTwo.value;
  }

  void subtract() {
    _currentSign.value = "-";
    _result.value = _numOne.value - _numTwo.value;
  }

  void multiply() {
    _currentSign.value = "x";
    _result.value = _numOne.value * _numTwo.value;
  }

  void divide() {
    _currentSign.value = "/";
    _result.value = _numOne.value ~/ _numTwo.value;
  }

  void reset() {
    _numOne.value = 0;
    _numTwo.value = 0;
    _result.value = 0;
  }
Here, we've removed the update function calls. The value setter and getter are used to assign and retrieve the actual values.
#3. Update the _calcWidget function in main.dart to use the Obx widget.
Widget _calcWidget() {
    final calcController = Get.find<CalculationController>();
    return Obx(() => Center(
        child: Text(
          "${calcController.numOne} ${calcController.currentSign} ${calcController.numTwo} = ${calcController.result}",
          style: const TextStyle(
              fontSize: 30, color: Colors.black),
        ),
      )
    );
  }
Here, the Get.find method is used to retrieve the controller that was injected in the build method since Obx does not have direct access to the controller instance.
#4. Run the project. It should still function as before.
Other Features
- Bindings
GetX also provides a convenient way of creating and initializing controllers in one place instead of doing it in the build method.
#1. Create a new dart file named init_controllers.dart and add the following code:
import 'package:get/get.dart';


class InitControllers extends Bindings {

  @override
  void dependencies() {
  }
}
#2. Add the following line in the dependencies method of the InitControllers class:
Get.lazyPut(() => CalculationController());
#3. Update the main method in main.dart to use GetMaterialApp in place of MaterialApp
void main() {
  runApp(
    GetMaterialApp(
      title: "GetX Example",
      home: const Home(),
      debugShowCheckedModeBanner: false,
    ),
  );
}
GetMaterialApp provides additional configurations on top of MaterialApp, which aids in the functionality of GetX.
#4. Initialize the InitControllers class
void main() {
  runApp(
    GetMaterialApp(
      title: "GetX Example",
      initialBinding: InitControllers(),
      home: const Home(),
      debugShowCheckedModeBanner: false,
    ),
  );
}
#5. Replace final controller = Get.put(CalculationController()); with final controller = Get.find<CalculationController>(); in the build method.
final controller = Get.find<CalculationController>();
This retrieves the controller that was injected in the InitControllers class.
#6. Run the project. It should continue running as before.
Service
GetX controllers are created on demand and discarded when they are no longer needed. This behavior is not ideal in situations where the controller is required throughout the application's lifecycle, for instance, when interacting with a database.
GetX provides GetxService which ensures that the service remains in memory until the application is killed.
GetxService can be created in different ways either by:
Extending the GetxService abstract class
Implementing the GetxService interface
Using the GetxService mixin
The snippet below shows how the GetxService can be integrated into our CalculationController class.
class CalculationController extends GetxController implements GetxService {}
Conclusion
In this article, we've covered how to use GetX to manage application state and the different approaches that can be used, all of which produce the same result.
Having read through this, I hope you now have a greater understanding of the benefits of GetX and how to implement it in your projects moving forward. You can find the link to the complete source code here.
Thank you for reading.