


Navigation is an essential part of any mobile application. A well-architected application provides users with consistent navigation which further enhances user experience and helps keep the app organized. Flutter provides several classes and methods which can be used to connect and move between different parts of your application.
Navigator 1.0
The initial version of Flutter introduced a simple set of APIs to navigate between screens, the most common ones being:
Navigator.of(context).push()Navigator.of(context).pop()
Also known as Navigator 1.0, these APIs provided a straightforward way to navigate. While they can still be used today, these APIs have several limitations, some of which are:
It is imperative.
It makes managing navigation in large apps difficult.
It doesn't support forward and backward navigation on Flutter web.
It doesn't handle the Android back button event correctly.
It doesn't update the web URL on the browser.
There is no access to the route stack.
Router API
To resolve these issues, the Router API (Navigator 2.0) was released with Flutter 1.22, providing a declarative way to navigate between screens, which is also backwards-compatible with Navigator 1.0.
Although, a major improvement on the Navigator 1.0 API, using the Router API can be daunting as it requires a lot of boilerplate code to set up. Different classes have to be created to handle displaying pages, manually parsing route information, converting route information to application state and vice versa.
Due to the complexity of the Router API, different flutter packages were developed to simplify its usage. Among them is go_router, which is officially recommended and maintained by the Flutter team.
In this article, we'll look at how to set up and use the go_router package to navigate, pass arguments between routes and handle redirects and errors.
Getting Started
To better illustrate the usage of go_router , I've prepared a basic application called Readr that we'll implement navigation with. Readr is an application with 8 screens and doesn't have any kind of navigation for now. We will use go_router to build the navigation logic as we go through the article. You can clone the starter project here to follow along.
Readr will have the following navigation structure:
SplashScreen
 └─ OnboardingScreen
      └─ LoginScreen
           └─ HomeScreen
                ├─ ExploreTab
                │    └─BookDetailScreen
                ├─  BookmarksTab
                ├─  ProfileTab
Project Setup
Run
flutter pub add go_routerin your flutter project's terminal to install thego_routerpackage.Run the project in your emulator/device to ensure everything is working as it should.
Create Routes
Routes point to destinations in your application. For instance, an OnBoardingScreen route would point to the OnboardingScreen. In go_router , a GoRoute object represents a single route.
To create routes, a GoRouter configuration object has to be created first. This object will contain the list of the app's routes.
Create a new directory named
routingin the lib folderCreate a
app_router.dartfile under the routing directoryAdd the following code to
app_router.dart:
import 'package:go_router/go_router.dart';
import 'package:readr/onboarding/onboarding_screen.dart';
import 'package:readr/splash/splash_screen.dart';

class AppRouter {
  late final router = GoRouter(
    initialLocation: '/',
    routes: [
      GoRoute(
        path: '/',
        builder: (context, state) => const SplashScreen(),
      ),
      GoRoute(
        path: '/onboarding',
        builder: (context, state) => const OnboardingScreen(),
      ),
    ],
  );
}
Here, we create a class called AppRouter that acts as a wrapper for the GoRouter object that will hold the routes. The GoRouter constructor takes a list of GoRoute objects in its routes property, which only contains the SplashScreen and OnboardingScreen routes for now.
GoRoute objects require a path property, which will be used when navigating to a route. The initialLocation points to the starting path of the application, which is the SplashScreen.
Note: the
GoRouterconstructor has adebugLogDiagnosticsproperty that can be toggled to true to log routes being navigated in the debug console. This is useful for debugging.
Configure MaterialApp
To complete routing configuration, the router object has to be passed to MaterialApp. The MaterialApp.router named constructor has a routerConfig property that takes a router object.
Let's go to main.dart to add the following code in MyApp widget's build method:
//Accesses the GoRouter object and stores it in the router variable
final router = AppRouter().router;
Next, replace MaterialApp() with the following:
MaterialApp.router(
        title: 'GoRouter Demo',
        debugShowCheckedModeBanner: false,
        theme: ThemeData(
          primarySwatch: Colors.blue,
        ),
        routerConfig: router,
      ),
Perform a hot restart. The app should still function as before, displaying the SplashScreen.

Splash screen of the Readr app
Navigate to a Route
To navigate to a route, go_router provides both the GoRouter.of(context).go() and the more convenient context.go() methods. We'll use the more concise context.go() method throughout this article.
Let's open
lib/splash/splash_screen.dartNext, let's replace
initStatewith the following code:
  @override
  void initState() {
    super.initState();
    Timer(const Duration(seconds: 3), () {
      if(mounted) {
        context.go('/onboarding');
      }
    });
  }
The code above navigates from the SplashScreen to the OnboardingScreen after 3 seconds using context.go().
Navigate with named Routes
In the previous section, we navigated to the OnboardingScreen by passing its path to context.go(). Using paths to navigate may not be the best choice as it is error-prone, especially when working with path and query parameters.
GoRouter offers the context.goNamed() method, which internally resolves the route's name to the route's path, which is more convenient. To navigate with names, the route's GoRoute object requires a name property.
#1. Let's go to lib/routing/app_router.dart
#2. In app_router.dart, let's give the OnboardingScreen's route object a name as shown in the code below:
GoRoute(
        path: '/onboarding',
        name: 'onboarding',
        builder: (context, state) => const OnboardingScreen(),
      ),
#3. Let's use the newly defined name in the SplashScreen's initState by replacing initState with the following code in lib/splash/splash_screen.dart:
  @override
  void initState() {
    super.initState();
    Timer(const Duration(seconds: 3), () {
      if(mounted) {
        context.goNamed('onboarding');
      }
    });
  }
#4. Perform a hot restart to update the changes.

Navigation from the SplashScreen to the OnboardingScreen.
Handling Redirects
GoRouter supports redirection, which is especially useful in situations where you want to restrict access to certain parts of your application to certain users like allowing only authenticated users to access the home screen and redirecting unauthenticated users to the login screen.
Both the GoRouter and GoRoute objects have redirect callback functions that can be used to perform top-level and route-level redirections respectively. The redirect callback is executed right before a navigation event and when the application state changes.
We'll use the top-level redirect callback to redirect users to our home screen once they've completed onboarding and are logged in and to also send logged-out users to the login screen.
#1. Let's go to lib/routing/app_router.dart and add two new routes to the routes list as shown in the code below:
      GoRoute(
        path: '/login',
        name: 'login',
        builder: (context, state) => LoginScreen(),
      ),
      GoRoute(
        path: '/home',
        name: 'home',
        builder: (context, state) => const HomeScreen(),
      ),
Here, we define the LoginScreen and HomeScreen routes.
Next, the GoRouter object needs to listen to changes to our app state to be notified of changes to the user's logged-in and onboarding status. Hence, an instance of UserProvider, which holds these states is needed.
#2. Let's add the following code to the AppRouter class:
  final UserProvider userProvider;

  AppRouter(this.userProvider);
Here, a userProvider field is created in the AppRouter class and passed to the class' constructor.
#3. Let's now add the following code to the GoRouter object's constructor in the AppRouter class:
    refreshListenable: userProvider,
    redirect: (context, state) {
      //One
      if(state.subloc == '/') {
        return null;
      }
      //Two
      if(!userProvider.isUserOnboarded) {
        return "/onboarding";
      }
      //Three
      if(!userProvider.isUserLoggedIn) {
        return "/login";
      }
      //Four
      if(state.subloc == '/onboarding' || state.subloc == '/login') {
        return '/home';
      }
      //Five
      return null;
    },
In the code above, the userProvider instance is passed to the refreshListenable property to enable the router to listen for changes to the application's state. Note that refreshListenable only accepts a Listenable object. userProvider is accepted since it is a ChangeNotifier.
The redirect callback executes redirects based on the application's current state in the following ways:
One: This
ifstatement checks whether the current route is theSplashScreen's path and returns null if true hence, no redirect is performed.Two: This
ifstatement is true if the user hasn't completed onboarding yet. TheOnboardingScreen's path is returned where the user is then redirected to.Three: Similar to the previous statement, this redirects the user to the
LoginScreenif they're not logged in.Four: This
ifstatement checks whether the current route is the Onboarding or Login screens path, the user is then redirected to the HomeScreen since they're already logged in.Five: This returns
null, and no redirect is performed.
#4. Let's head to main.dart where we have to pass a userProvider instance to the AppRouter's constructor. Now, let's replace final router = AppRouter().router with the following line:
final router = AppRouter(userProvider).router;
Here, we're passing the userProvider instance to the AppRouter's constructor.
#5. Perform a hot restart to update the changes.
Subroutes
Routes can be nested within other routes. These nested routes are called subroutes or child routes. A child route is displayed on top of the parent route like a stack. When subroutes are used, a back button is also added to the child route's AppBar if defined.
Subroutes can be created by passing a routes list to a GoRoute's object routes property. Given a navigation structure with a hierarchy of one/two/three. The subroutes can be defined as follows:
GoRoute(
        path: '/one',
        name: 'one',
        builder: (context, state) => One(),
        routes: [
          GoRoute(
            path: 'two',
            name: 'two',
            builder: (context, state) => Two(),
            routes: [
              GoRoute(
                path: 'three',
                name: 'three',
                builder: (context, state) => Three(),
              ),
            ],
          ),
        ],
      ),
Here, three is a child route of two, which is a child route of one, producing a one/two/three navigation structure. Notice that subroutes' paths do not have a leading / in their values unlike in top-level routes.
In our Readr app, we'll add a book-detail subroute to the home route to show a more detailed view of a book.
Let's go to lib/routing/app_router.dart, where we replace the home route with the following code:
GoRoute(
        path: '/home',
        name: 'home',
        builder: (context, state) => const HomeScreen(),
        routes: [
          GoRoute(
            path: 'book-detail',
            name: 'book-detail',
            builder: null,
          )
        ],
      ),
null is passed to the book-detail builder function for now as the function will be implemented in the next section when we discuss path parameters.
Path and Query Parameters
Arguments can be passed to routes both as path and query parameters. Path parameters are defined by suffixing a path definition with a colon : and a parameter name. Unlike path parameters, query parameters don't have to be defined.
Arguments passed as path and query parameters are retrieved from the GoRouterState object of the route's builder function.
Back to our Readr app, we'll pass an id to the book-detail route using bookId as a path parameter. The id will then be used to get the book that will be displayed on the BookDetail page.
In lib/routing/app_router.dart, let's replace the book-detail subroute with the following code:
GoRoute(
        path: 'book-detail/:bookId',
        name: 'book-detail',
        builder: (context, state) {
           final bookId = int.tryParse(state.params['bookId'] ?? '') ? 0;
           final book = context.read<BookProvider>().getBook(bookId);
           return BookDetail(book: book);
          },
        ),
Here, we define the bookId path parameter by appending it to book-detail subroute's path. Inside the builder function, we obtain the passed argument from the GoRouterState params property, which is a map. The retrieved argument is a String, so it is first parsed into an int and then passed to the getBook method of BookProvider, which returns a book that is finally passed to the BookDetail screen.
To navigate and also pass the bookId argument to the route, let's do the following:
#1. Go to lib/book/home/explore_tab.dart
#2. Replace the onTap callback in buildBookItem with the following code:
onTap: () {
      context.goNamed(
         'book-detail',
         params: {
           'bookId': book.id.toString(),
         },
        );
  },
In the code above, a map with a key-value pair of bookId and value is passed as params argument to the goNamed() method.
Note: When
context.go()is used to pass arguments as path parameters, the argument is included as part of the route's path. For instance, the path will have the following structure:context.go('/home/book-detail/${book.id}');
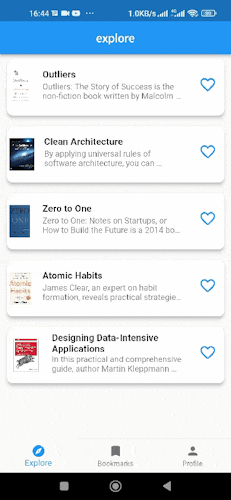
#3. Perform a hot restart. Tapping on a book listTile will navigate us to the BookDetail screen.
Navigation to a book's detail screen.
We've seen how arguments are passed as path parameters to a route. Let's now refactor our code to use query parameters.
While still on explore_tab.dart, let's replace the onTap callback with the following code:
onTap: () {
    context.goNamed('book-detail', queryParams: {
       'bookId': book.id.toString(),
       'title': book.title,
       'description': book.description,
       'author': book.author,
       'imagePath': book.imagePath,
         });
   },
Here, a Map of query parameter items is passed as an argument to queryParams. These items will be retrieved in the route's builder function.
In lib/routing/app_router.dart, let's replace the book-detail subroute with the following code:
GoRoute(
  path: 'book-detail',
  name: 'book-detail',
  builder: (context, state) {
   final bookId = int.tryParse(state.queryParams['bookId'] as String) ?? 0;
   final title = state.queryParams['title'] as String;
   final description = state.queryParams['description'] as String;
   final author = state.queryParams['author'] as String;
   final imagePath = state.queryParams['imagePath'] as String;
   final book = Book(
       id: bookId,
       title: title,
       description: description,
       author: author,
       imagePath: imagePath,
   );
   return BookDetail(book: book);
   },
 ),
Inside the builder function, the arguments passed as query parameters are retrieved and then used to create a book object, which is passed to the BookDetail screen.
Note: A cleaner implementation would use helper methods in the
Bookclass to easily convert betweenqueryParamsMapandBookobjects.
Extra Route Argument
We've seen how arguments are passed as path and query parameters. Both context.go and context.goNamed also have an extra parameter, which we can pass objects to. This object is then retrieved from GoRouterState.extra property in the route's builder function.
#1. Let's replace the book-detail's subroute object in lib/routing/app_router.dart with the following code:
 GoRoute(
     path: 'book-detail',
     name: 'book-detail',
     builder: (context, state) {
        final book = state.extra as Book;
           return BookDetail(book: book);
        },
     ),
Inside the builder function, the object passed to the route is retrieved from state. extra and then passed to the BookDetail screen.
#2. Next, let's go to lib/book/home/explore_tab.dart
#3. Now, let's replace the onTap callback in buildBookItem with the code below:
onTap: () {
    context.goNamed(
      'book-detail',
       extra: book,
    );
 },
#4. Perform a hot restart. Tapping the book listTile will navigate to the detailed view.
Error Handling
GoRouter has a default error screen that is displayed when you try to navigate to a route that doesn't exist. While this is unlikely to happen with mobile apps, it can come in handy in Flutter web apps.
The default error screen can be replaced with a custom error screen by passing a custom screen to the errorBuilder property of the GoRouter object.
#1. in lib/routing/app_router.dart, let's add the code below to the GoRouter object:
errorBuilder: (context, state) => ErrorScreen(
      error: state.toString(),
    ),
#2. Let's also add the code below to the onPressed callback of ErrorScreen in lib/error/error_screen.dart to enable navigation to the HomeScreen when the button is tapped.
context.goNamed('home');
#3. Launch the app in a chrome browser and try to navigate to a route that doesn't exist to see the error page.
Url Strategy
When running the application on a browser, the URL contains a "#" symbol, which can feel out of place as seen in the image below:

To remove this, we'll use the url_strategy package.
Run
pub add url_strategyin your project's terminal to install the package.Open
main.dart, addsetPathUrlStrategy();in the main method, and import the package.Launch the app on Chrome. The "#" should be gone now.
Conclusion
go_router provides a lot of features that make routing in Flutter apps easy.
We've used the go_router package to connect the screens of our Readr app. We've also explored how to configure a router, add routes, move between different routes, and pass arguments to routes.
I hope you found this article helpful and that you now fully understand how to use go_router in your projects. You can find the complete code here.